
 Reviewed By: Jenne
I have a secret! Want to know what it is? Buried not so deep in the bottom of my refrigerator is a masterpiece of confectionery, never the like which has been seen before or is likely to be repeated. This is a one off piece, as unique and rare as its creator!
Forget ice sculpting the next big thing this year could be chocolate molding according to the company that makes this ‘make your own willie kit.’ So one Saturday night Hubby and I decided to test the manufactures claims and create our own masterpiece.
Personally I appreciate good clear instructions and it was great that when I discovered we didn’t need to be a chemist or have a degree in order to read these. Simple, clear and straightforward was how we found these and that’s just the way they should be as by now Hubby was beginning to wonder exactly what he had let himself in for!
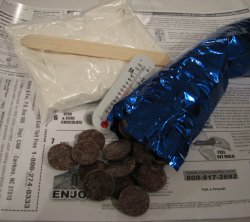
I collected everything together that we needed according to the instructions:
A measuring jug
Water
The kit itself
Duct tape
A microwave safe mixing bowl
Timer
Scissors and a pen
One willing willie
The kit its self includes:
Molding kit
Molding powder
Thermometer
Melt and mold chocolate
Wooden Stick
After some simple but enjoyable foreplay Hubby was ready for the task at hand. So we followed the instructions to the letter and began by sizing up the tube that the the kit came in as this is the molding tube. If you have a slight bend in your willie have no fear, there are instructions for this included as well. Basically we measured Hubby up and cut the tube to size, then used the duct tape to seal the cut edge of the plastic tube as losing your willie to a piece of plastic is not a very good idea.
The next step was to get out the measuring jug and begin mixing the molding material. Now this step is important and is where the thermometer comes into play. The water must be at the right temperature for the molding material to work: 98 degrees F or this won’t work. All’s good so far and I begin to add the molding powder and mix before pouring it quickly into the ready prepared tube. Now the fun really started!
We had just two minutes from the time we added the water to the mix to get it on Hubbies willie before it set and set hard. So picture the scene Hubby is stood in the living room, erect willy in hand looking slightly scared as I plopped a tube full of semi viscous molding mix over his manhood. A slight twist to make sure he wasn’t touching the sides of the tube and then we waited for the material to do its job. I should mention here that this stage of the operation turned out to be messy, if we make another one, we will be doing it in the kitchen or somewhere with no carpet on the floor! Although clean up only took some hot water, it would have been a lot easier on a linoleum floor rather than the living room carpet.
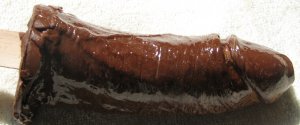
A couple of minutes later the molding mix had gelled and it was time to free willie and after a couple of turns and a quick tug, we released willie back into the wild. After a suitable cooling period thanks to the refrigerator we began to melt the chocolate provided in the microwave. Make sure you do this slowly, and in short bursts, until the chocolate is smooth and creamy.
Now all we had to was insert the thermometer into the chocolate and wait until it cooled to below 90 degrees and then simply pour it into the chilled willy mold and chill it once more.
Five minutes later we were ready to harvest the fruits of a labor! After a quick trip under the faucet we proceeded to gently remove the mold from its tube and were surprised by what was revealed. A perfect replica of Hubbies willie! Even he was amazed at the detail that the mold captured, every vein could be seen but most of all Hubby was amazed by how big his willy really was. This was obviously the first time his willie had been detached from his body so to speak and the first time he had really had chance to see it’s actual size from any angle rather than simply looking down at it.
Now all that remained was to reward Hubby for his bravery!
What’s it all add up to?
This kit was a whole lot of fun to make and to use. The fact that the instructions were easy to follow basically ensured we ended up with the desired results. The actual molding part can get messy so make sure you have something on the floor for easy clean up but apart from that we found the whole process a fun way to spend a Saturday evening.
The whole process is a lot easier when you have help and the company recommends that you have just that when you make the mold itself. The finished product, as long as you follow the steps carefully and I strongly recommend you read all of the instructions before starting the process, is strong, durable and actually quite tasty.
Like all chocolate products there was some blooming or white coating that appeared when it was cooled but that was easily remedied with a light coating of cooking oil. This kit is not designed to be used in the vagina but it can be eaten and the company has other products that actually create a fully functioning vibrator or dildo. We intend to test these out in the very near future and you can be sure we will be bringing you those results as well.
If you’re looking for a fun and tasty evening with your partner, this kit will provide just that. Eating the chocolate afterwards is fun and sexy and makes for some good foreplay. All in all we enjoyed this sweet treat from start to finish!
You can purchase your own willie molding kit by clicking on the image above or HERE.
[starthumbsblock tpl=25]